

Dingy And Dark No More Basement Bathroom Reveal
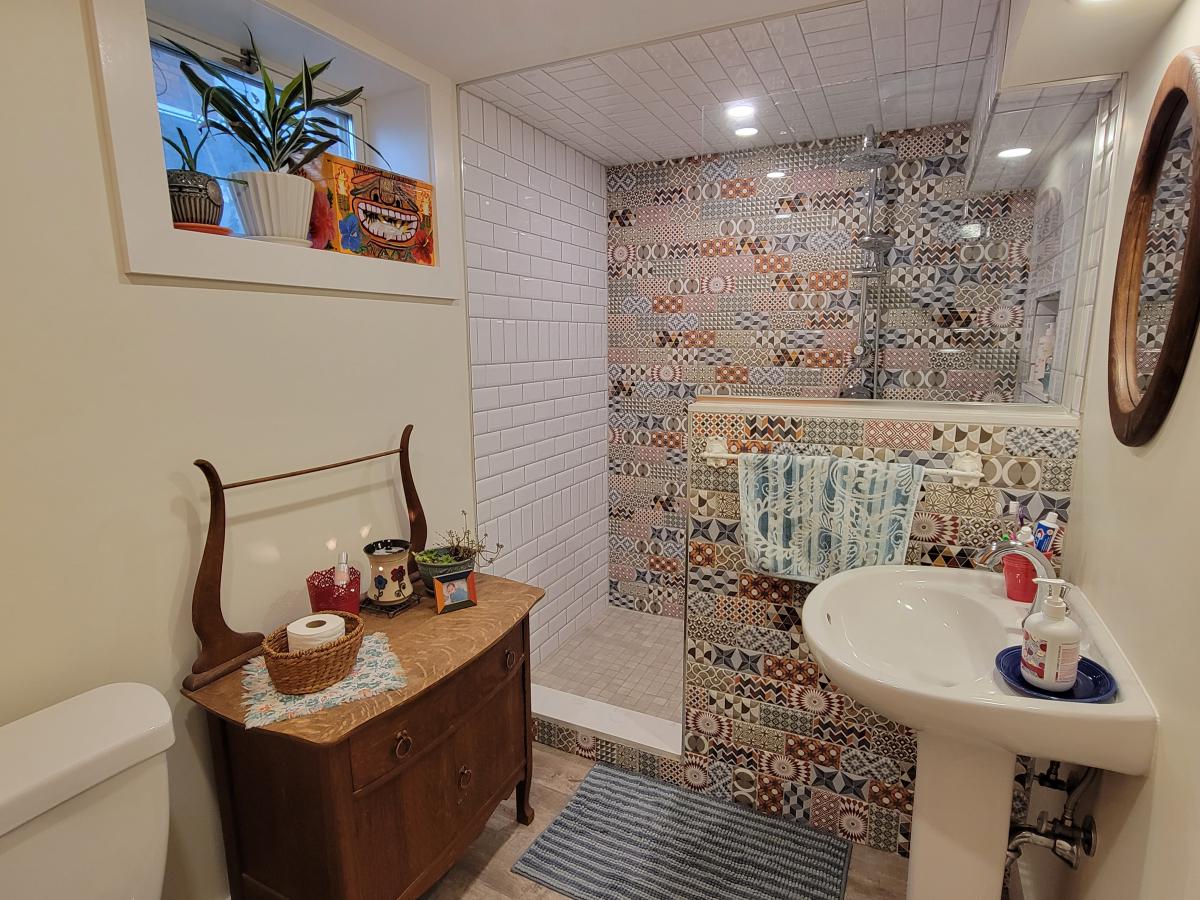
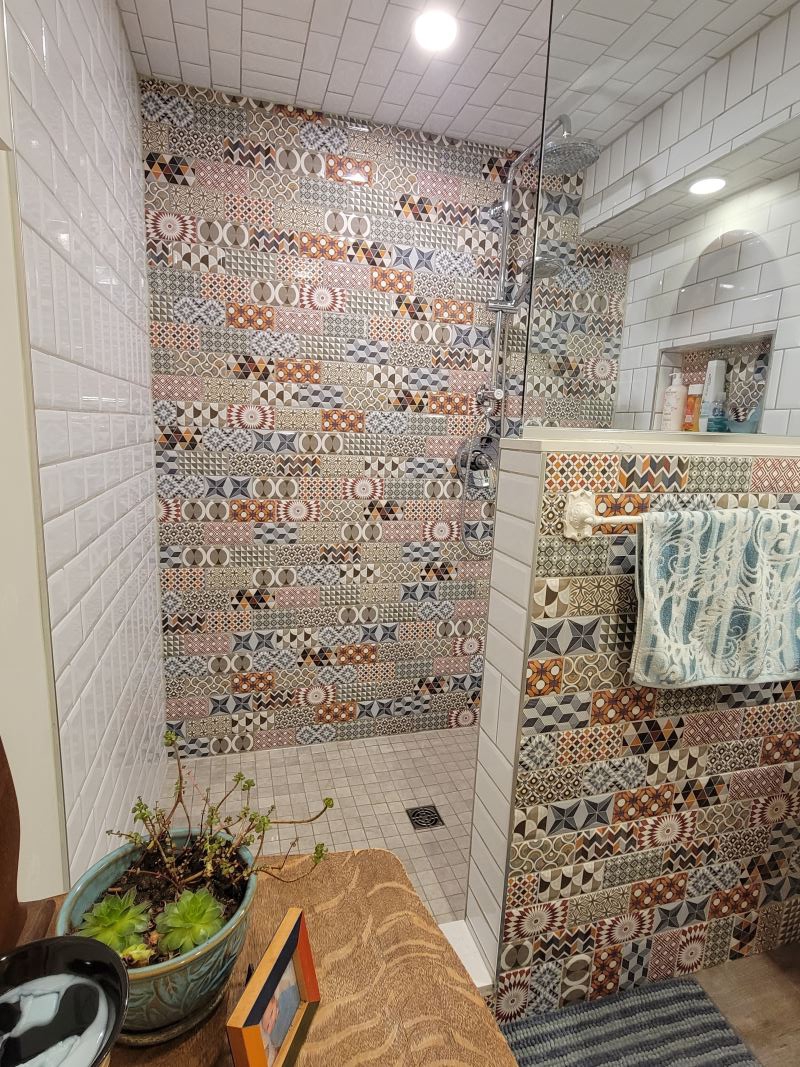
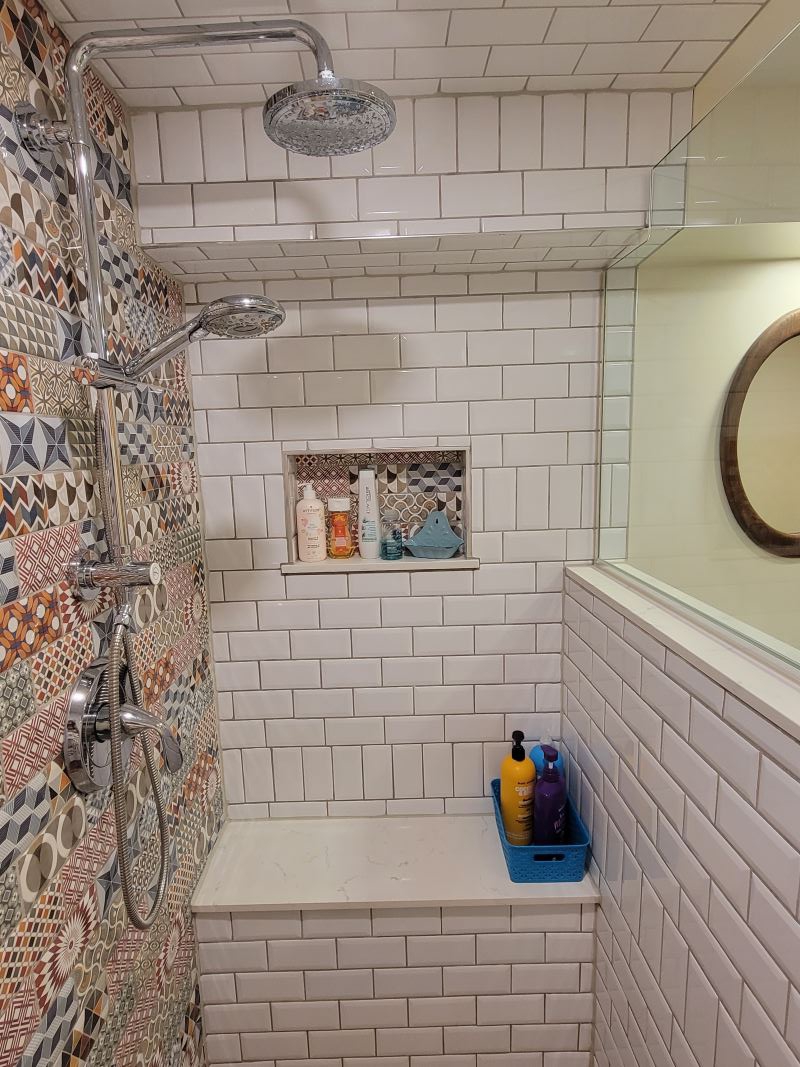
I shared the photos of what my basement looked like in an earlier post because the difference between then and now is pretty incredible....if I do humbly say so myself as a very green designer! The jumping off point for the design of the bathroom was absolutely the Centura Metro Patchwork Wall Tiles. I had seen these tiles in a friend's shower a few years earlier and took a photo of them because I knew that if the time ever came to put a bathroom in my basement, I wanted to use these tiles. I loved the colour and whimsy of this design and I felt like it was definitely a gutsy choice, but that anyone that saw it would think "Oh that is so Brooke!" Of course at that time, I didn't get any other information on the tiles. All I had was my photo, so I did have to play a bit of an internet image sleuth to track them down when my renovation time came.
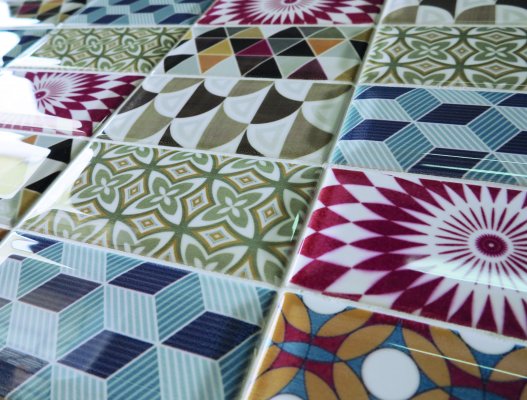
Stock Photo: Centura Wall Tiles-Metro Patchwork
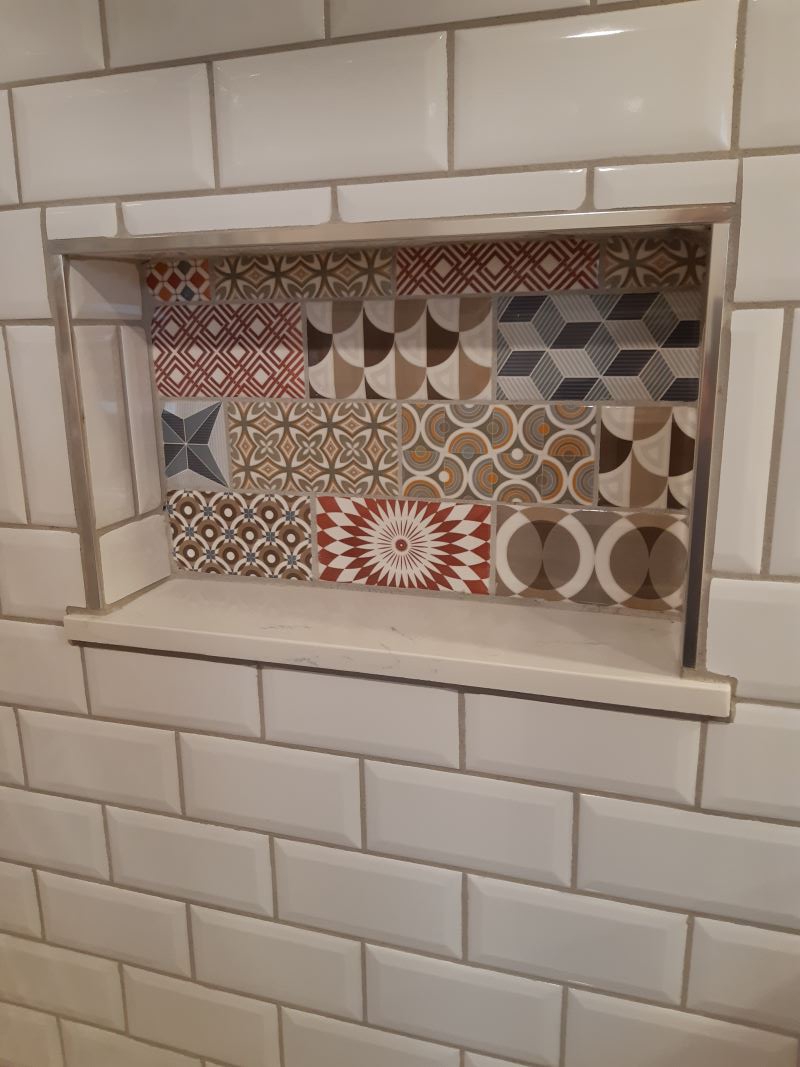
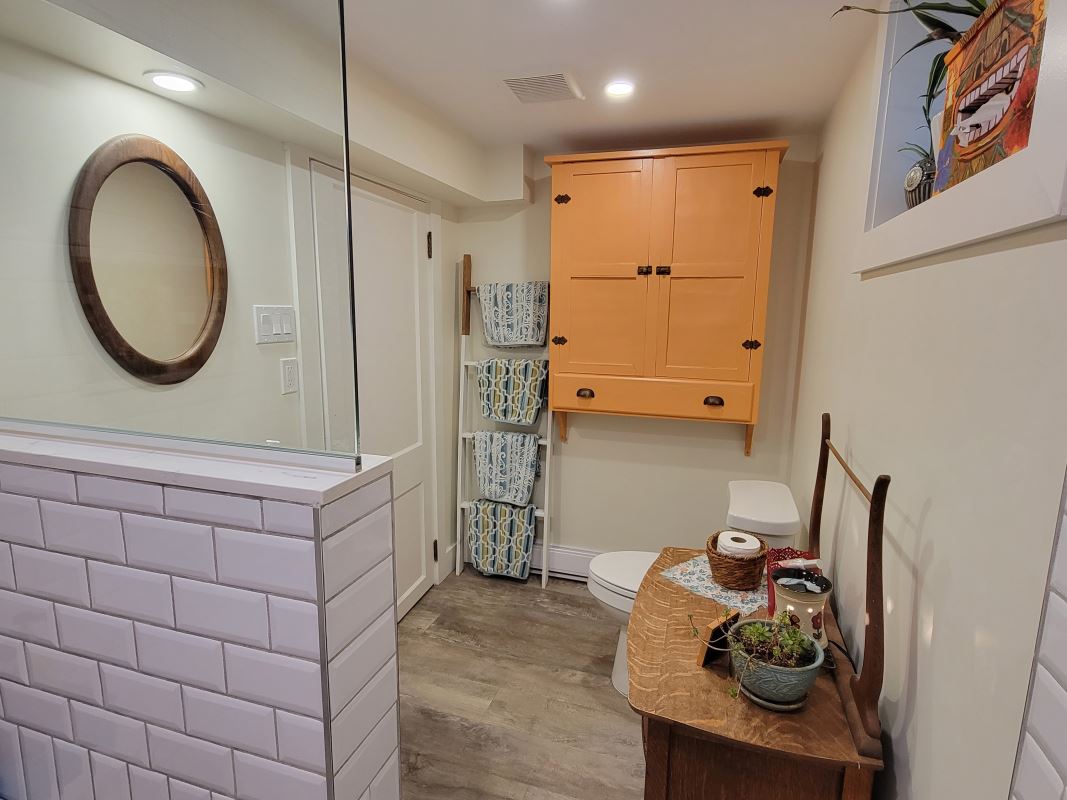
I had a decent amount of space allocated for the bathroom and had a few specifics about what was important to me. I wanted it to be a step in, all tile shower and I didn't want to have a shower curtain. I wanted the tiles to be the star of the show and not to have them covered up by a curtain at all. I also wanted to have a half wall, so I could have the tiles used on the outside of the shower and double as a spot for my towel bar and glass on the upper part of that half wall. I wanted a niche to hold all my shower bottles (keep reading for a "niche tip" I learned the hard way...) I wanted a dual shower head (handheld and rainhead) for the fixture. I had a list of wants without any actual clue on how to design a shower. This is where my contractor had to make sense of my wants and figure out how to put them into reality.
Disclosure: Some of the links in this blog are affiliate links. This means that, at zero cost to you, I will earn an affiliate commission if you click through the link and finalize a purchase.
I wanted a really big shower, so my sink option was a pedestal sink rather than a vanity. That was cool though because I actually had an American Standard Pedestal Sink sitting in my basement just waiting to be used. Don't ask me why. I often buy renovation supplies for "someday" projects and this sink was in my basement for years. I was warned that there may be a lack of storage space without a vanity but I had a plan for that.
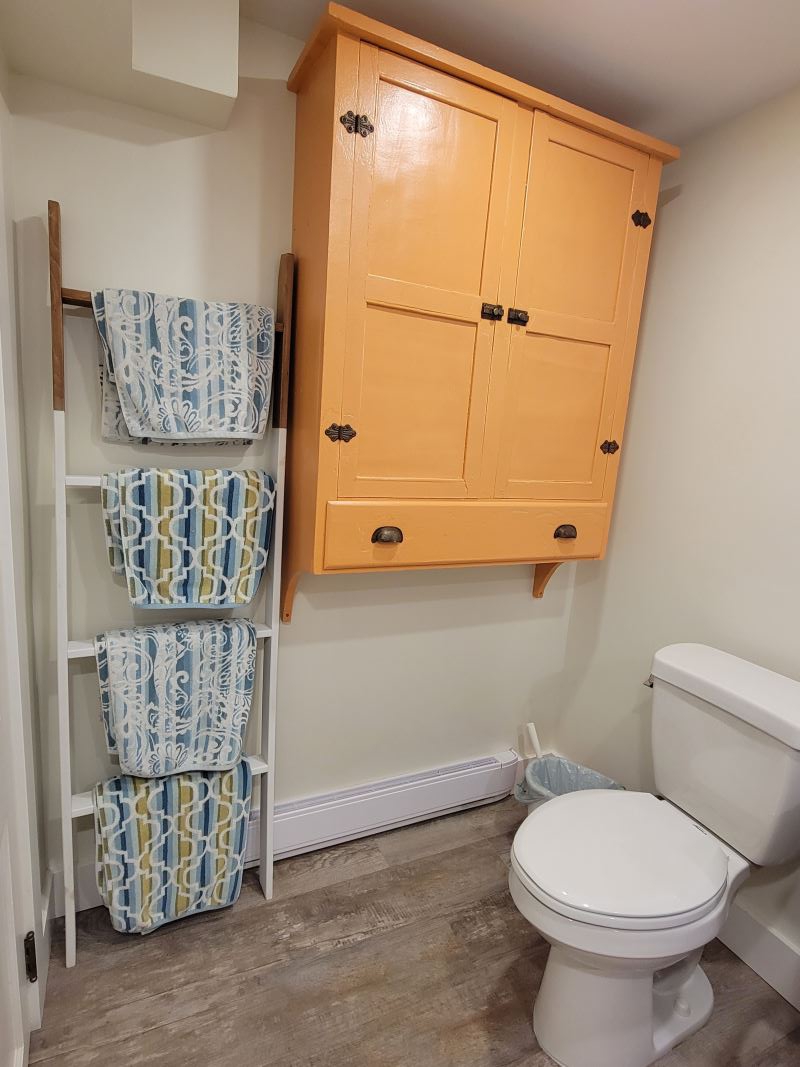
Remember that awful, green wooden cabinet from my Dingy Dark Basement post? Here's a picture to refresh your memory.
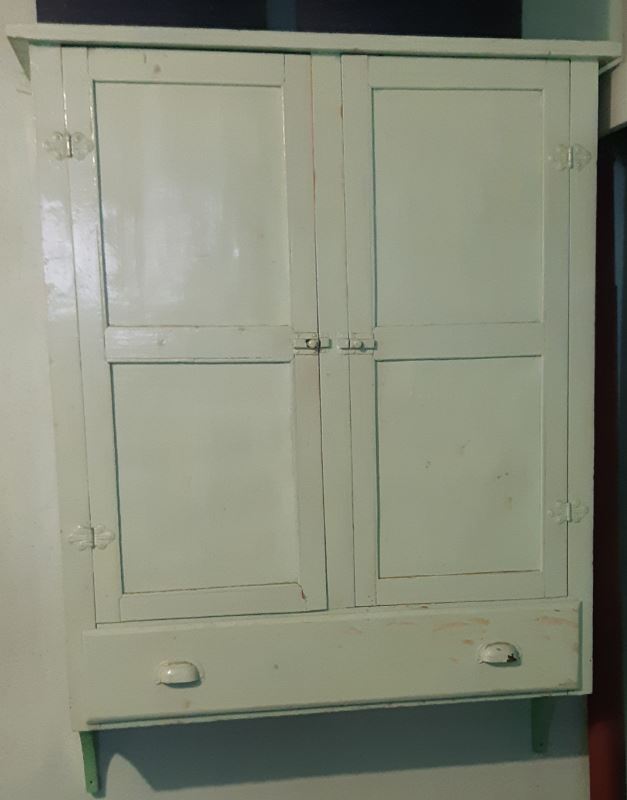
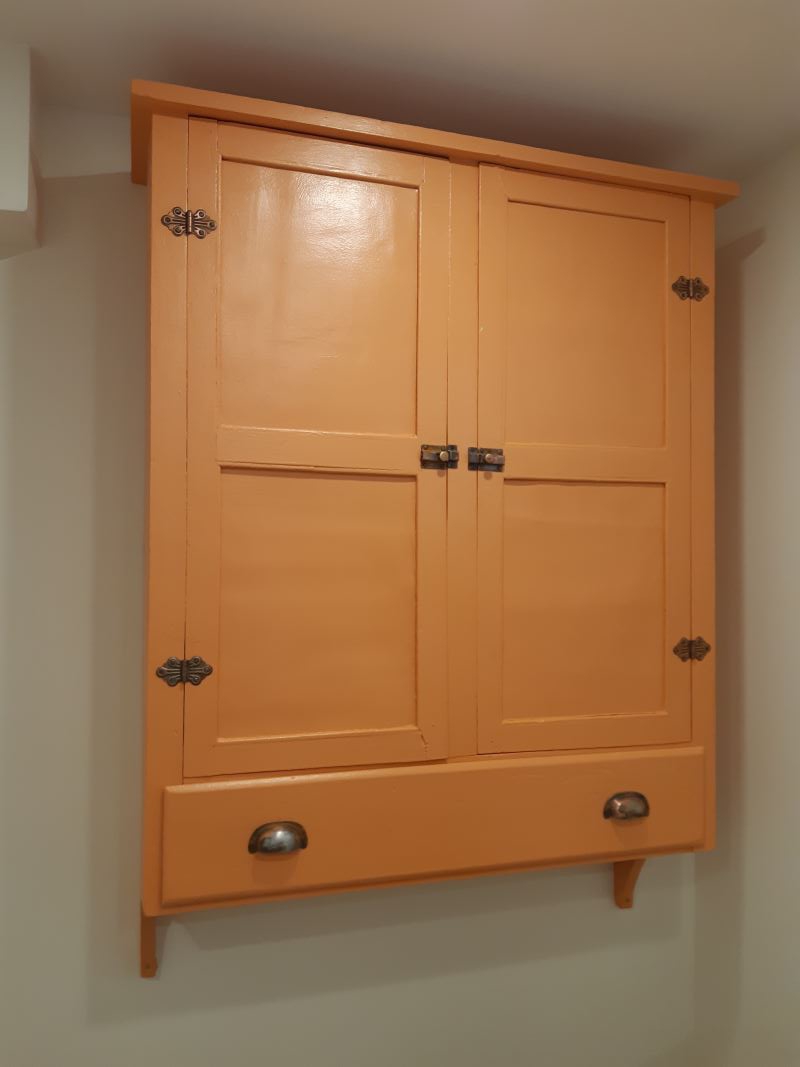
This cabinet came with the house and I can only assume it had been there for many many years. It was a heavy, solid cabinet and it had the potential to hold a ton of stuff. It was ugly though! The mint green colour was awful and the hardware fixtures had been painted multiple times by the look of them. I had a vision to strip the hardware and bring it back to its original beauty and give the whole cabinet a good sanding and a paint makeover. Most of the guys working for me thought I had lost my mind and should just buy a new cabinet, but part of my style is to integrate the old in with the new and there was no way this beauty was going to the dumpster.
.jpg)
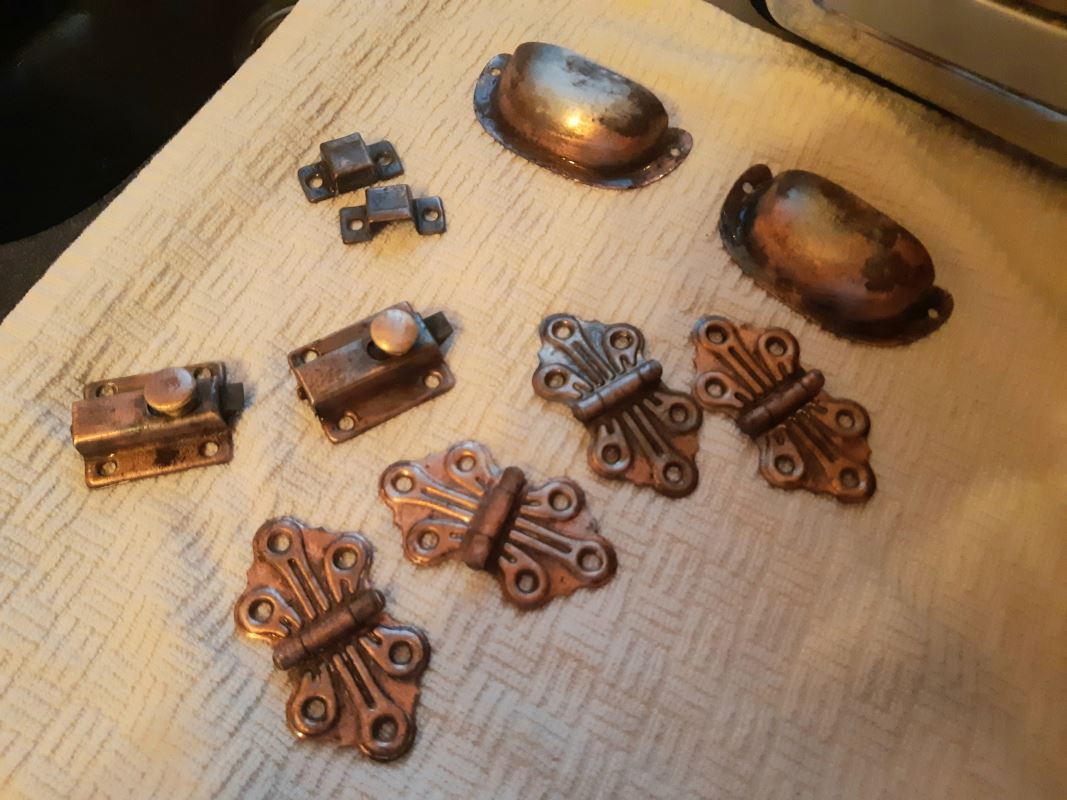
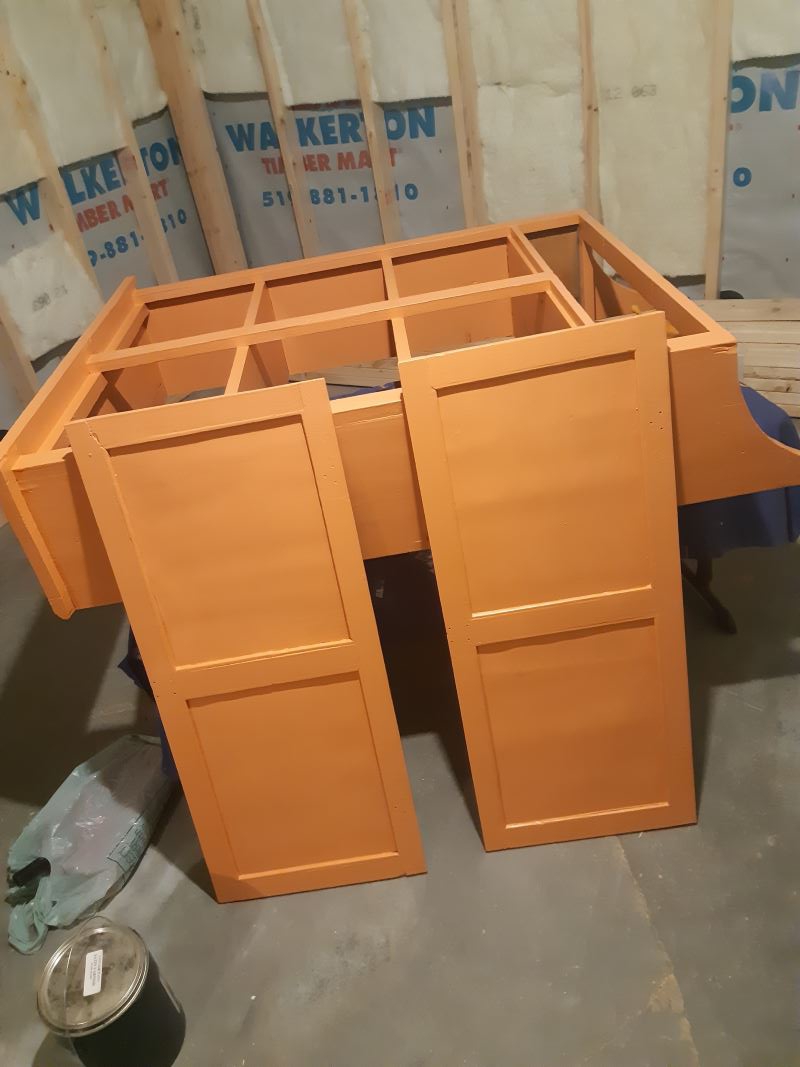
The most time consuming part of "Operation Cabinet Makeover" was stripping the hardware. I discovered a product a few years ago called Blue Bear Soy Gel Coatings Remover and absolutely swear by it for paint stripping. It has come to my rescue a few times in my home projects. You simply paint the gel onto whatever you're stripping, let it sit for a few hours, scrape the gucky paint off and repeat as needed. Once all the paint is removed, I wash the pieces with some hot water and scrub with Blue Dawn Platinum Dish Soap and some non-scratch wire dish cloths (which will very likely end up in the garbage after you're done!) It's a messy job. I curse every single painter that is too lazy to remove the hardware and paints over it instead. Seriously...please....don't paint hardware! The cabinet turned out beautiful though and it holds all I need to store in the bathroom. All of my cleaning products, small hand towels and wash cloths, toilet paper, extra hand soap, body wash, toothpaste etc. all fits perfectly in this beauty.
Ok so we have the sink, the shower and the storage cabinet sorted out. A friend of mine worked for a place that sold plumbing supplies and I bug her every so often to help me source products and she was able to recommend a toilet that she herself used in a bathroom renovation and really liked. My tile guy is actually a relative and he took great care in the tile installation (under my strict instruction to not have any of the same two tiles touching each other. It was a good thing we were related because he put up with my emotional, pregnant self during this reno! Oh and my "Niche Tip" I promised. I didn't give the guys any size in particular to build the niche. I just sort of eyeballed it and said it looked good. What I should have done was get the largest possible bottle of shampoo that would be going in it and make sure it is tall enough to fit. My giant Costco sized bottles of my favourite shampoo and conditioner are too tall for my niche and they have to sit on the shower bench instead. It irritates me. I also would have measured it so that the tiles could be placed in whole, instead of having to be cut to fit. It would have just made for a nicer looking niche to have the full tiles in it., instead of a row of cut ones. It's fine and it works...But in this instance, I should have accounted for the height to be five rows of tiles to give the height I needed for my shampoo bottles and to not have to cut the top row of tiles at all. I know my tile installer would have appreciated that too! I learn things along the way in every single renovation I tackle and this was one of those learning moments for me this time. It's also something to keep in mind that the contractors are there to work with you but if you don't give them specifics like "well I am not sure of the exact measurement, but this is the size of the bottles that need to fit in it", they can't read your mind and in this case, once it's notched out, they can't change it once it comes time to place the tiles. Not an earth shattering issue in the bathroom by any means, just a small thing that irks me.
For flooring, I had been planning on a tile floor, but then I realized that another set of tiles was not only going to be busy, but also very expensive. I remembered that I had some unused vinyl plank flooring from my kitchen renovation and I decided to just order more of that to be able to use up what I had and to save a bit of money. I am happy I went with the vinyl floor because it is so easy to care for and looks great too.
Overall, I am thrilled with how this space turned out and with three kids, two of them teenaged girls, it is so nice to have more than one bathroom in the house. Taking a nice long shower in this cheerful bathroom can make even a dark day feel bright in this beautiful space.
I'll share the rest of my basement renovation, the kitchenette and pantry, in another post soon.

Brooke

Writing an "About Me" is not easy. How do I pick and choose the pieces of my life that molded me into the person I am or deem the milestones and memories as important enough to tell you about in this little "About Me"...Well, I often joke that I have Read more about me...